From Manual Tests to AI-Driven Automation: A Real-World POC with Playwright MCP on SlayItCoder
🎥 Watch the demo →
🚀 What You’ll Learn
What MCP (Model–Context–Protocol) is and how it unlocks safe tool usage for LLMs
How to use GitHub Copilot Agent + Playwright MCP to automate UI tests using plain English.
How Copilot generates and validates tests without writing selectors manually
What’s still manual in the workflow — and where we’re heading next
Real test examples on SlayItCoder.in
🧠 Fun Insight: MCP is like hiring an AI intern who’s finally allowed to touch your keyboard and mouse — but only after your permission.
🛠 Before MCP: A Manual-Copilot Mashup
Before GitHub Copilot Agent and MCP, Copilot could write Playwright code — but you had to inspect the page, guide the structure, and test everything manually.
Old Workflow | Copilot Could Help With | But You Still Had to... |
Write test() boilerplate | ✅ | ✍️ Prompt every step manually |
Inspect selectors in DevTools | ❌ | 📋 Copy/paste every selector |
Debug flaky tests | ❌ | 🔁 Rerun + log dive |
Switch between code & browser | ❌ | 🎛️ Context-switching overhead |
It was like having a fast typer — but not a true testing assistant.
🔄 What MCP Brings to the Table
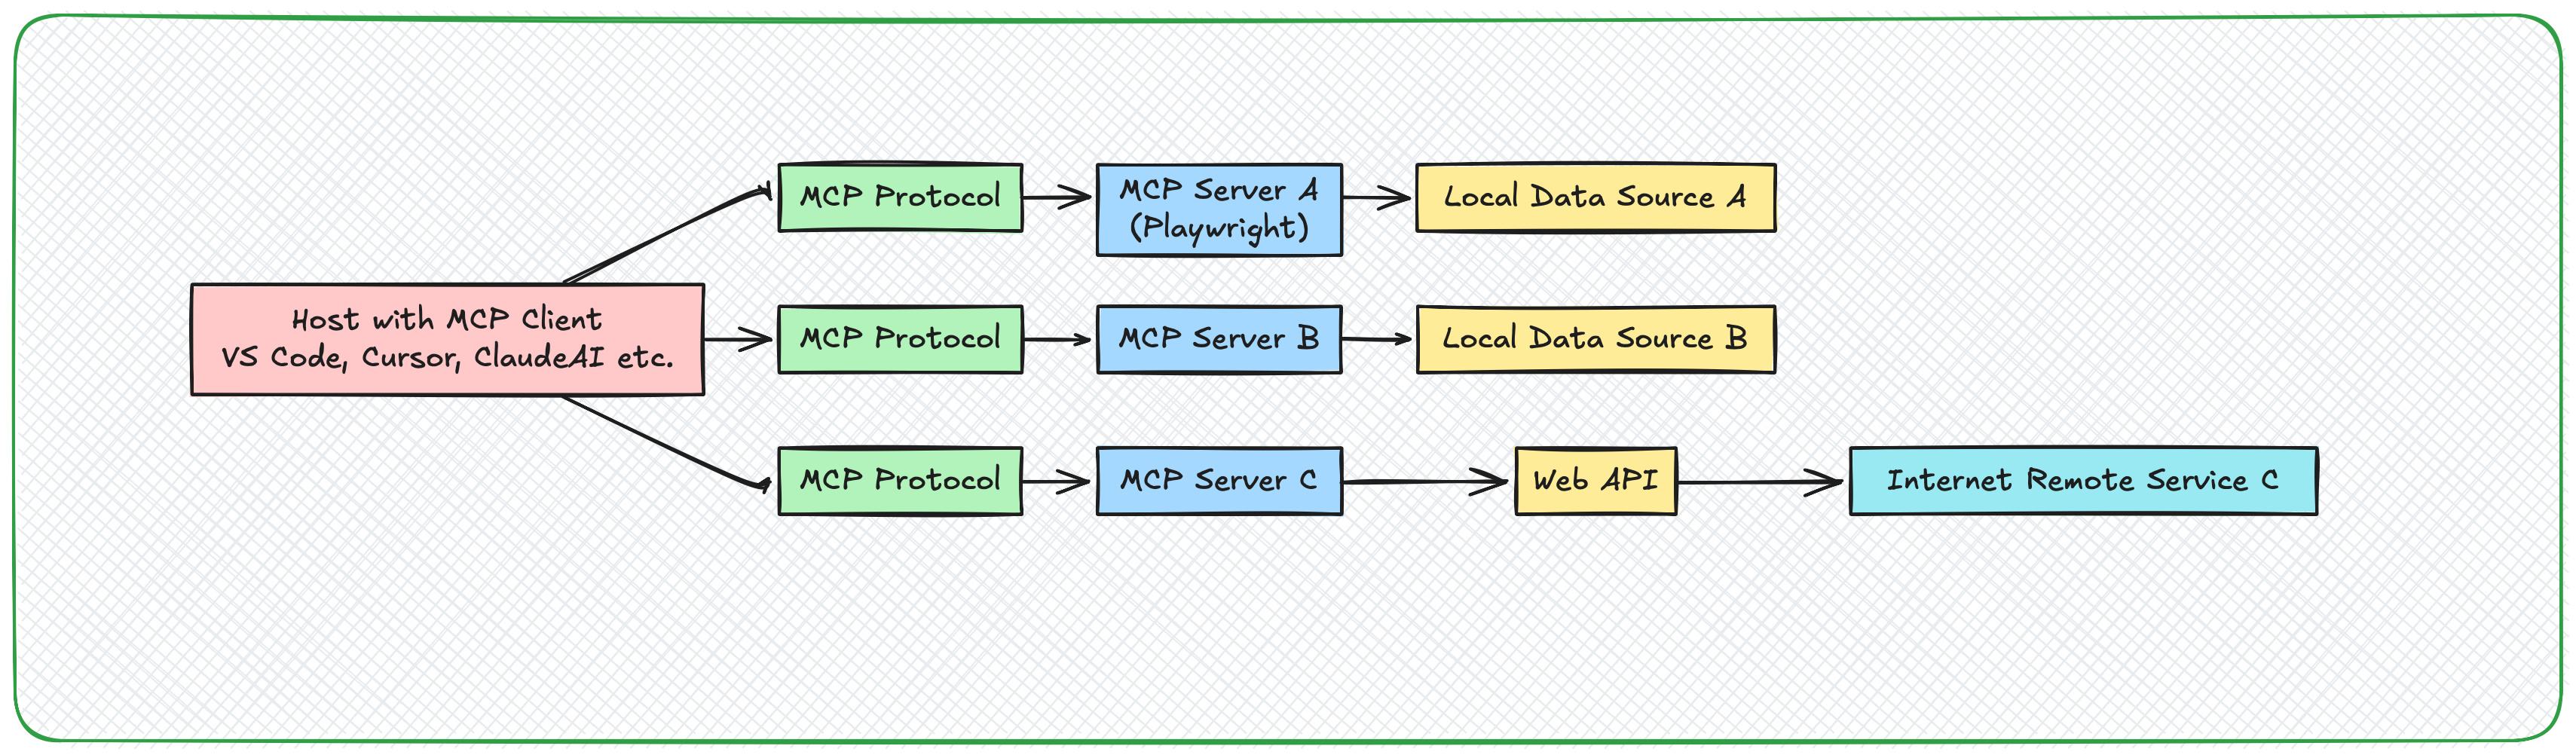
Model–Context–Protocol (MCP) is an open source protocol developed by Anthropic to establish a standard, secure way for LLM like — like Claude or GPT — to interact with external tools (e.g., databases, APIs, browsers, shells).
Think of it as a bridge between:
🤖 The LLM (Model)
🧠 Your open project (Context)
🛠 A secure way to act (Protocol)
With Playwright MCP, the LLM can now:
Open URLs
Click elements
Extract text
Assert conditions
Generate .spec.ts test files
🧪 Goal: Automate Tests for our blog-site
✅ 1. Set Up the Project
mkdir blog-mcp-tests && cd blog-mcp-tests
npm init -y
npm install -D @playwright/test @playwright/mcp typescript ts-node
npx playwright install
✅ 2. Start the MCP Server
npx playwright-mcp
You'll see:
MCP Server started Web server started
Optional debug log:
DEBUG=mcp* npx playwright-mcp
✅ 3. Configure VS Code to Talk to MCP
In settings.json, add:
{
  "chat.mcp.enabled": true,
  "chat.agent.enabled": true,
  "mcp": {
    "servers": {
      "playwright": {
        "command": "npx",
        "args": ["@playwright/mcp@latest"],
        "type": "stdio"
      }
    }
  }
}
Reload VS Code and:
Open the Copilot Chat panel
Switch to Agent mode
Go to Tools → Enable Playwright
✅ 4. First Prompt: Check Page Title
Prompt:
Use the "playwright" tool to open https://blog.slayitcoder.in and assert the title contains "SlayItCoder"
Result:
✓ Page opened ✓ Title validated ✓ Assertion passed
No code written. Just natural language.
✅ 5. Turn This Into Code
Prompt:
Convert the above into a test and save to tests/homepage.spec.ts
Generated:
import { test, expect } from '@playwright/test';

test('Home page title contains SlayItCoder', async ({ page }) => {
  await page.goto('https://blog.slayitcoder.in');
  await expect(page).toHaveTitle(/SlayItCoder/i);
});
Run it:
npx playwright test
✅ 6. Click First Blog & Assert Heading
Prompt:
Click the first blog article, extract its title, and ensure the next page <h1> matches
Result:
test('First article opens & H1 matches', async ({ page }) => {
  await page.goto('https://blog.slayitcoder.in');
  const card = page.getByRole('article').locator('a').first();
  const expectedText = await card.textContent();
  await card.click();
  await expect(page.getByRole('heading', { level: 1 })).toHaveText(expectedText!);
});
📺 Watch the Full Walkthrough
🎥
📚 Resources
Here are a few handpicked links for deeper dives:
🔗 Playwright MCP GitHub Repository This is where all the Playwright–MCP magic lives. Stars = love for dev tooling.
📖 Kailash Pathak on Medium: Modern Test Automation with AI, LLM, and Playwright MCP
🌐 Official MCP Introduction The launchpad for devs and tool builders to explore MCP.
🔚 Wrap-Up
✅ Works Well | ⚠️ Still Manual |
Writing & running tests by prompt | Starting MCP server |
Navigating, clicking, asserting | CI/CD setup |
Handling role-based selectors | Some flaky waits |
Fast .spec.ts generation | Auth & fixtures |
🚀 Final Thought
What we saw here isn’t just test generation — it’s the start of a new interface paradigm. We’re moving from “write the test” to “describe the behavior.”
📚 Keep Learning with Me
📬 Join the newsletter on Substack for practical AI insights
Let’s keep time traveling with AI — one model at a time.