Ever wondered how to get AI model outputs from your local setup, even if your laptop can’t handle the heavy lifting? In this post, we'll walk through how to run a document summarization model using Google Colab, and how to connect it to your local machine seamlessly — all without paying for cloud infrastructure.
This approach gives you the power of cloud-based AI models, while keeping your own workflows fast, flexible, and free.
🌎 Why Running the Model Locally Isn't Always Practical?
Running AI models locally sounds appealing, but it's often not feasible — especially for newer, heavier models. Here’s a quick comparison:
Model Type | Example Models | Can Run Locally? | Requirements |
Lightweight NLP | T5, BART | ✅ Yes (Limited) | ~2–4 GB RAM, works slowly without GPU |
Mid-sized Transformers | DistilBERT, RoBERTa | ⚠️ Partially | Better with 8+ GB RAM and mid-range GPU |
Large Language Models | GPT-3.5, GPT-4 (ChatGPT) | ❌ No | 40–350 GB GPU VRAM; only accessible via API |
Challenges on local setup:
Models may fail to load due to RAM/GPU limitations.
Inference is slow or not possible on CPU for larger models.
Large models like GPT-4 are closed-source and can’t be downloaded.
Google Colab offers free access to GPUs like Tesla T4, which makes it a perfect choice for offloading compute-heavy AI tasks.
🤖 What Model Are We Using?
We use thes shleifer/distilbart-cnn-12-6 model from Hugging Face — a pretrained transformer specialized for abstractive summarization.
If you want to explore models like this, head over to huggingface.co/models. You can:
Search by task (e.g., summarization, translation, question answering)
Filter by model size or architecture (e.g., BART, T5, GPT)
See example inputs/outputs, model cards, and usage instructions
Try models live in your browser using Hugging Face’s hosted inference
This makes it super beginner-friendly — you can find a model that fits your needs and quickly test it before integrating into your app.
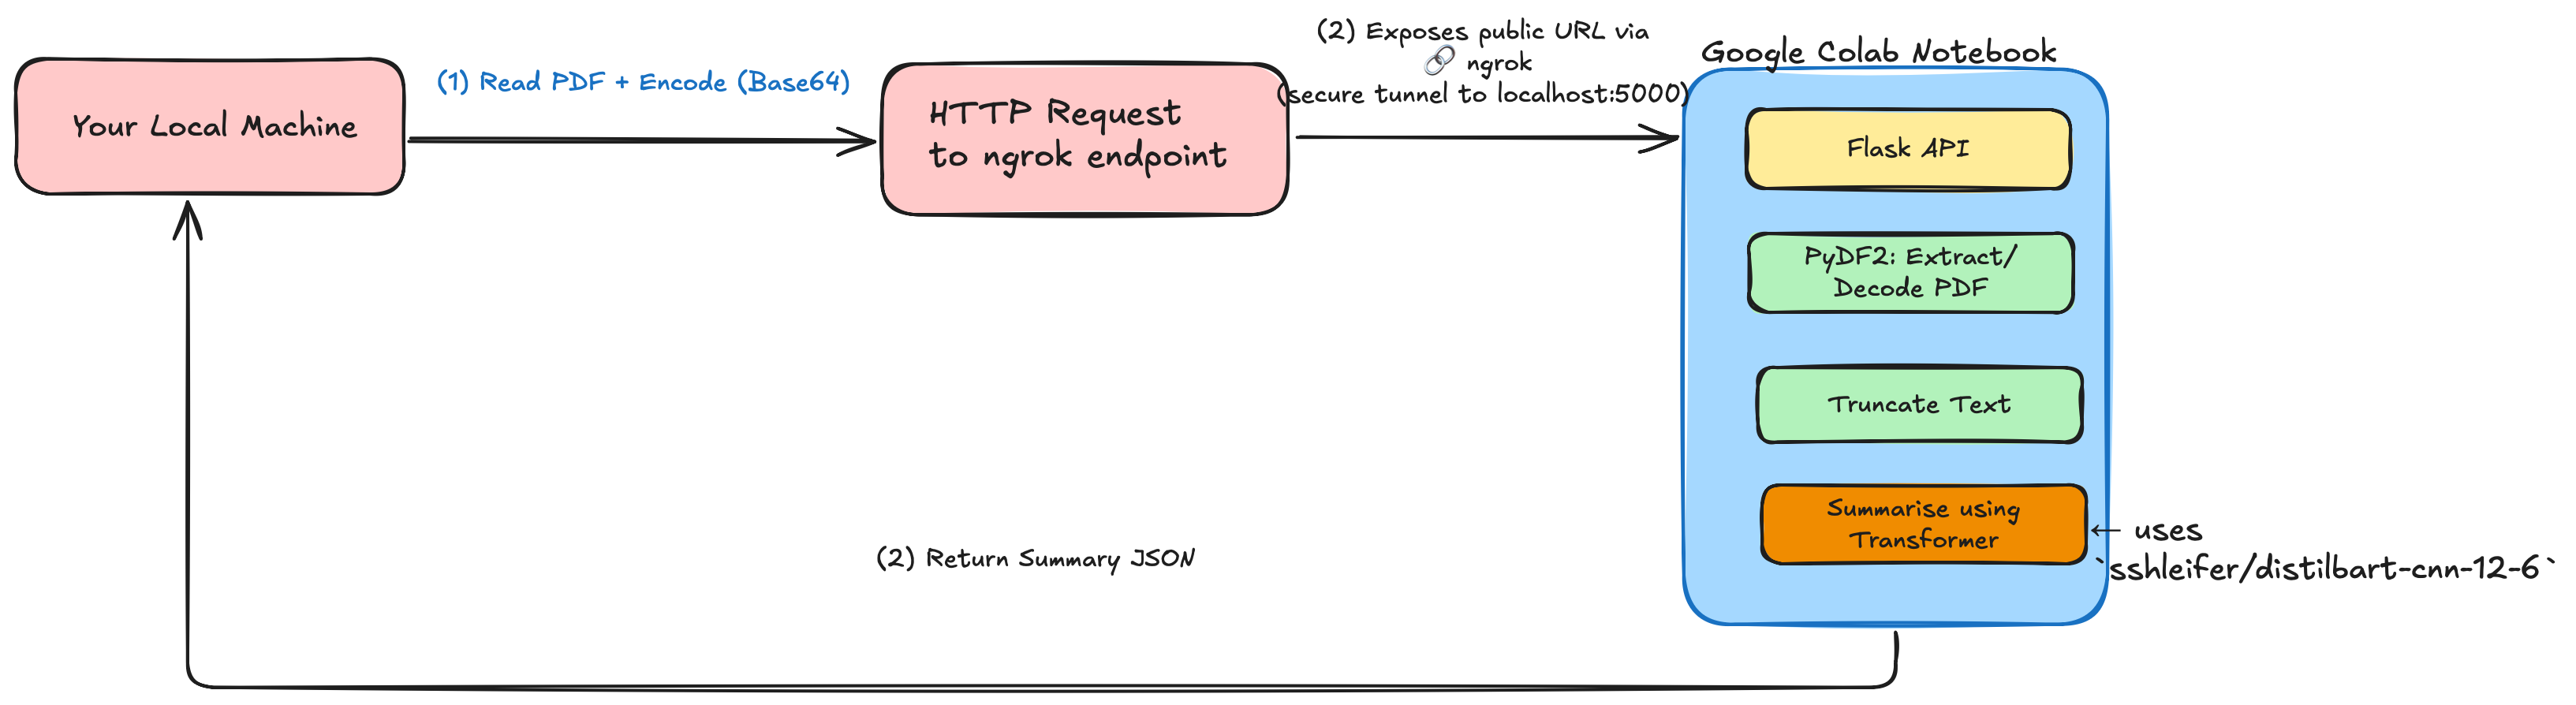
⚖️ Setting Up the Model and Making It Accessible
At this point, we’ve picked a model from Hugging Face and can run it in Google Colab using a simple pipeline("summarization"). The next challenge is: how do we send data to Colab from our local machine and get the result back?
To solve this, we:
Create a lightweight Flask API inside the Colab notebook
Use ngrok to expose the API to the internet
🔓 What is ngrok?
ngrok is a tunneling service that exposes your Colab’s local Flask server to the public web. This allows your laptop or any external app to make requests to Colab in real time.
Example:
Colab starts a Flask server on
localhost:5000ngrok exposes it as
https://abc123.ngrok.ioYou send requests to this public URL from your local machine
🚀 Architecture Overview
Here is a detailed flow of the system we will be creating.
⚡ Step-by-Step: Building the System
1. Setting up Colab Notebook
Install dependencies:
!pip install transformers PyPDF2 flask-ngrok
Start your Flask server with summarization logic:
from flask import Flask, request, jsonify
from flask_ngrok import run_with_ngrok
from transformers import pipeline
import PyPDF2, io, base64

app = Flask(__name__)
run_with_ngrok(app)

summarizer = pipeline("summarization", model="sshleifer/distilbart-cnn-12-6")

@app.route('/summarize', methods=['POST'])
def summarize():
    base64_pdf = request.json['pdf']
    pdf_bytes = base64.b64decode(base64_pdf)
    reader = PyPDF2.PdfReader(io.BytesIO(pdf_bytes))
    text = " ".join(page.extract_text() for page in reader.pages[:5])[:3000]  # limit to 3000 chars
    summary = summarizer(text, max_length=150, min_length=50, do_sample=False)
    return jsonify({"summary": summary[0]['summary_text']})

app.run()
Token limit: Most transformer models can't process more than ~1024 tokens at once, so we truncate the input text.
2. Call from Local Machine
import requests, base64
with open("sample.pdf", "rb") as f:
    encoded = base64.b64encode(f.read()).decode("utf-8")

res = requests.post("http://<your-ngrok-url>.ngrok.io/summarize", json={"pdf": encoded})
print("Summary:", res.json()["summary"])
📈 Advantages of This Setup
No GPU needed on your local machine
Easy to scale: switch model, chunk PDF, or plug into a UI
Build smarter tools like auto-summary bots, PDF digesters, report generators
🔍 What to Explore Next
If you enjoyed this walkthrough, there’s more structured, beginner-friendly content waiting for you:
📘 Slay It Coder Blog — I post every weekend about AI, ML, deep learning, and real-world applications of models like the one used here. It’s a structured, hands-on learning path.
📬 Subscribe to my newsletter on Substack — Get updates, tips, and project walkthroughs delivered right to your inbox.
🧩 Tech Stack Summary
Here’s a recap of the tools used in this project and what they do:
Component | Purpose | Link / Access |
Google Colab | Cloud-based Python notebook with free GPU | |
Hugging Face | Provides pre-trained transformer models | |
Flask | Build REST API in Colab | |
ngrok | Expose Colab server to public URL | |
PyPDF2 | Read and extract text from PDFs |
🙌 Final Thoughts
By offloading the heavy lifting to Google Colab and keeping your local setup lightweight, you unlock access to powerful language models without any hardware upgrades. This architecture can scale to many other use cases — like document Q&A, PDF keyword extraction, and even summarizing audio transcripts.
Here is the full Colab notebook. Reach out on linkedin and subscribe my weekly Newsletter for exciting tech content.