If you’ve been using GitHub Copilot Chat lately, you may have noticed something new under the hood — a protocol called MCP, short for Model Context Protocol.
In a previous post, we explored how Playwright MCP can help your Copilot autonomously run, validate, and fix your Playwright test scripts — if you haven’t checked it yet, here’s the link:
Copilot + Playwright MCP – Automate Testing Like a Pro
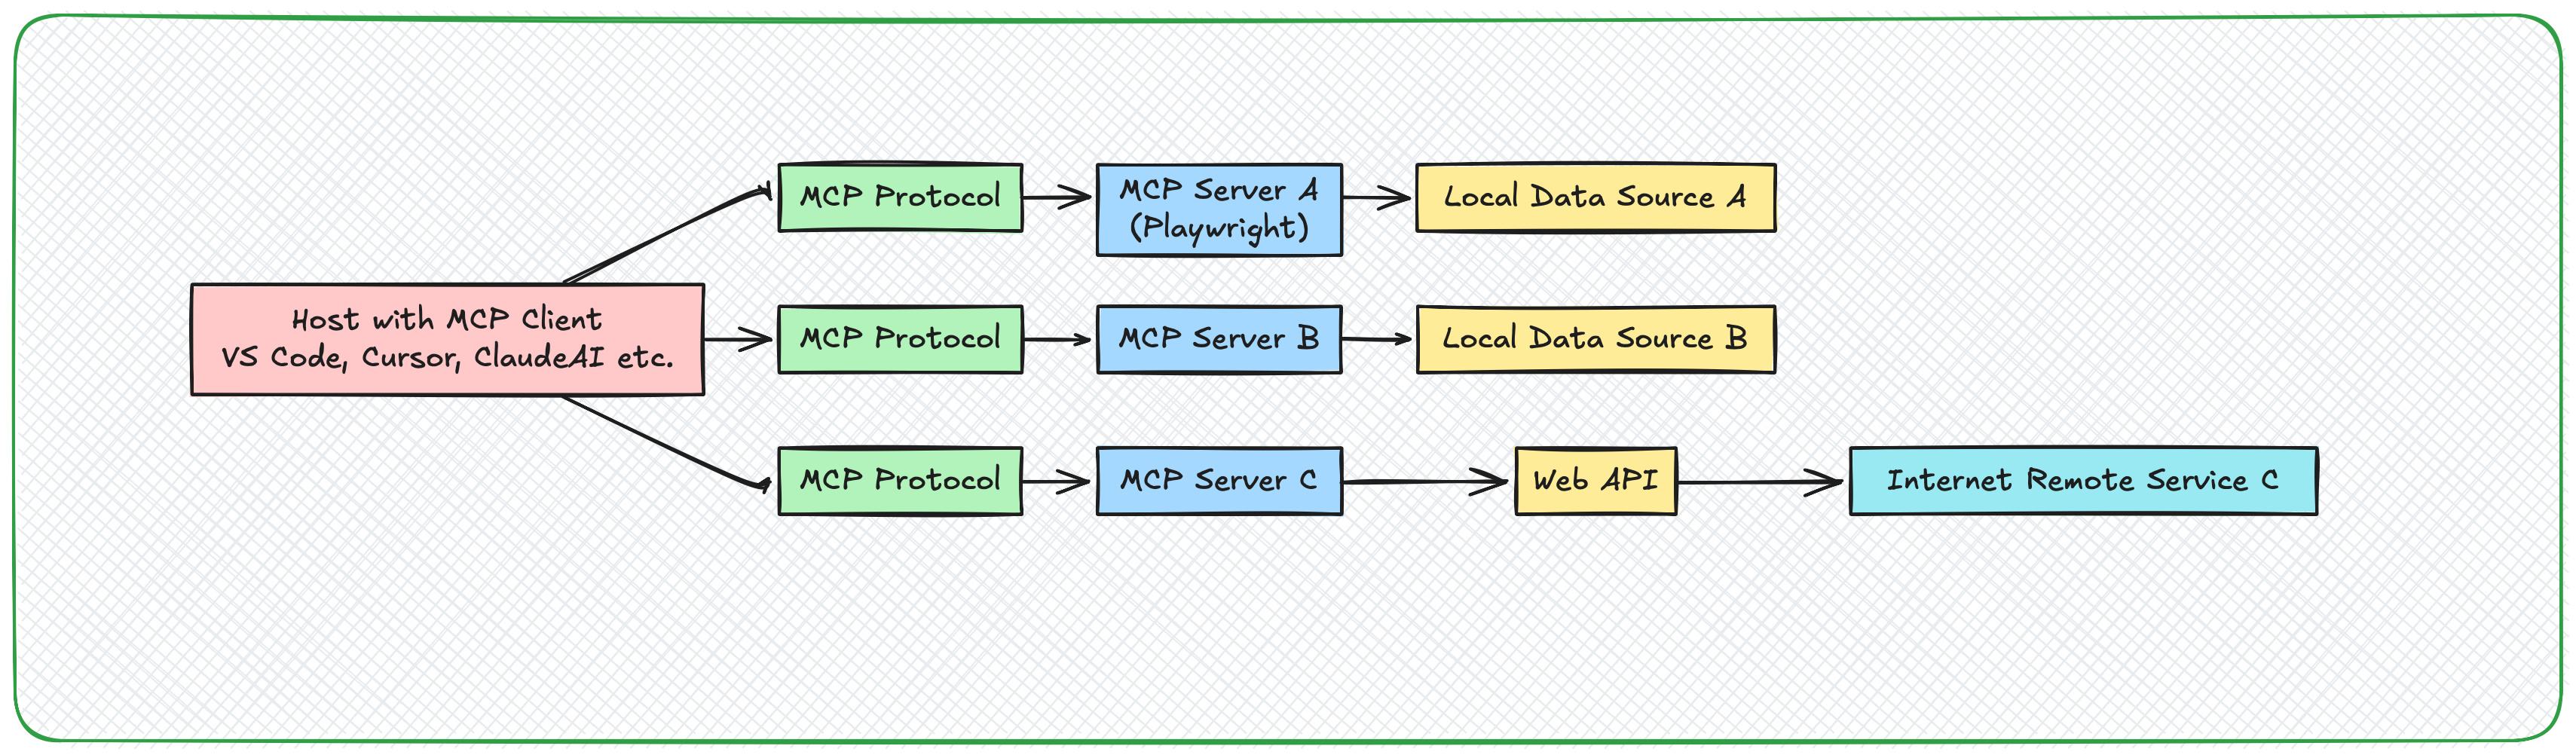
In simple terms, MCP allows your AI assistants (like Copilot or LLMs) to connect with external tools and data in a secure, structured way.
Think of MCP as the middleware between your model and your environment. It lets AI agents fetch live data, run commands, or inspect codebases — all through standardized JSON-RPC calls.
And unlike APIs, MCP doesn’t need servers, ports, or HTTP calls. It works over stdio, meaning the model and tool can talk directly — fast and local.
Why I Decided to Build a Custom MCP Server
In one of my projects, we were dealing with complex DB hierarchal dependencies and multiple views being refactored after a data model change.
Manually tracking relationships was time-consuming, even with Postgres extensions which is provided for VS Code.
So I thought:
“Why not let AI introspect my database directly — in a controlled, programmable way?”
That’s when I built my own custom MCP server in Python, which exposes Postgres metadata and queries as AI-discoverable tools.
Now, Copilot Chat can run:
/mcp list tables
/mcp sample {"table": "employee"}
and instantly get real data context — all without exposing HTTP APIs.
MCP Server Anatomy
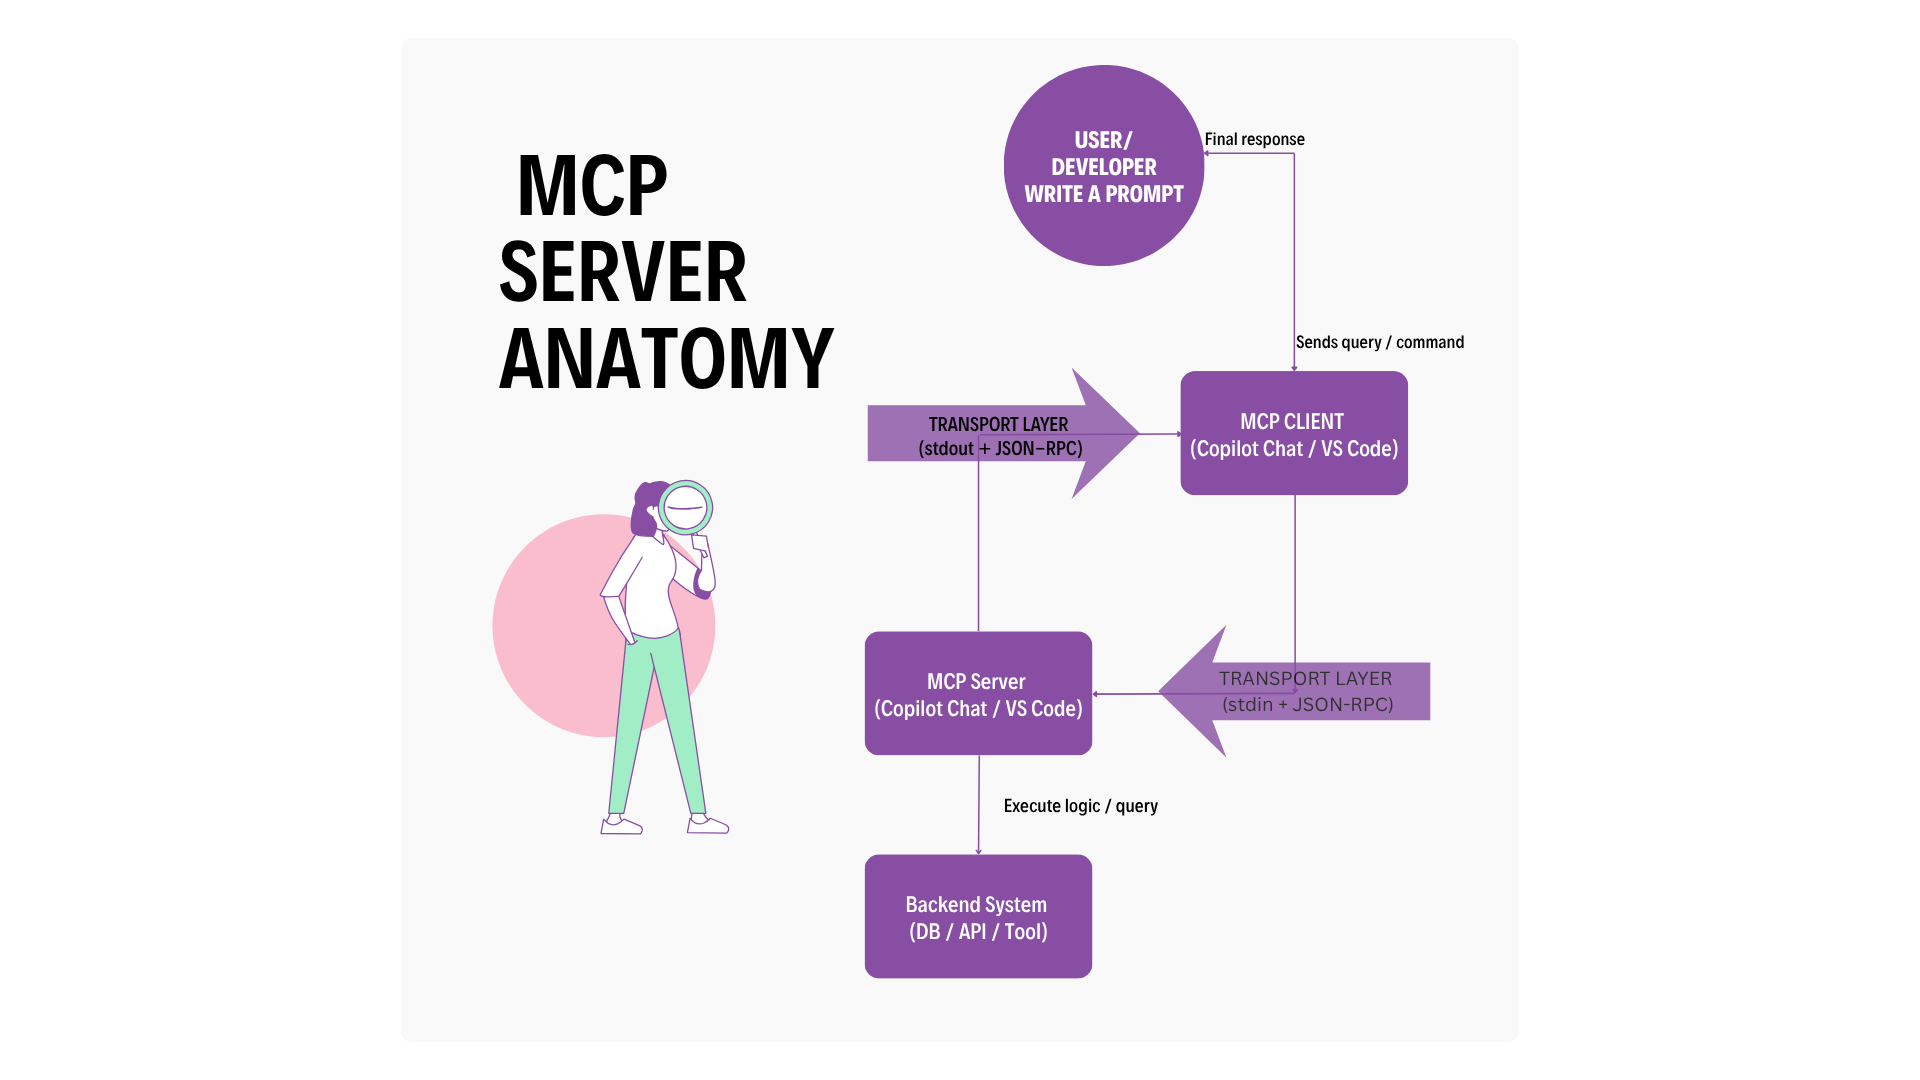
Let’s break it down:
Component | Role |
FastMCP | Python framework implementing the MCP spec |
Transport Layer (STDIO) | Enables direct communication between Copilot and the tool |
JSON-RPC | Defines how commands and responses are structured |
MCP Tools | Your exposed methods like tables(), views() ,sample() |
mcp.json | VS Code config that registers your MCP server |
How I Built It
Create a Python project
mkdir local-mcp && cd local-mcp
python3 -m venv venv
source venv/bin/activate
pip install fastmcp psycopg2
Build your server
from fastmcp import FastMCP
from app import db

mcp = FastMCP("postgres-mcp-server")

@mcp.tool
def tables(schema: str = "public"):
    return db.list_tables(schema)

@mcp.tool
def sample(schema: str = "public", table: str = None, limit: int = 10):
    return db.sample_rows(schema, table, limit)
Connect Postgres (running in Docker)
services:
  postgres:
    image: postgres:15
    container_name: mcp_pg
    environment:
      POSTGRES_USER: pguser
      POSTGRES_PASSWORD: pgpass
      POSTGRES_DB: mcpdb
    ports:
      - "5432:5432"
Register it with VS Code
Create .vscode /mcp.json file
Restart VS Code and run in Copilot Chat:
mkdir local-mcp && cd local-mcp
python3 -m venv venv
source venv/bin/activate
pip install fastmcp psycopg2
Understanding pyproject.toml and How the MCP Server Is Loaded
When you build a Custom MCP Server, it’s not just about writing Python code — it’s about packaging it properly so that VS Code (or any MCP-compatible client) can discover and launch it as an extension.
That’s where the pyproject.toml file becomes crucial.
What is pyproject.toml?
The pyproject.toml file is like the blueprint of your Python project. It defines how your project is structured, what dependencies it needs, and how it can be built or installed.
Think of it as the modern replacement for setup.py — simpler, more standardized, and widely supported across Python tooling.
Here’s an example from our Custom MCP Server:
This tells Python:
Your project is named
local-mcpIt requires Python 3.10+
It depends on FastMCP and psycopg2
It can be installed with pip using standard build tooling.
Installing the Custom MCP as a Dependency
Now, here’s something interesting you’ll notice — when you open a new VS Code instance (for a completely different project) and configure your mcp.json, VS Code somehow already knows about your custom MCP server.
Because you installed it as a dependency inside your Python environment — which is exactly what the pyproject.toml enables.
You typically install it using: pip install -e .
This command:
Installs the MCP server inside your virtual environment,
Registers it as a Python package (local-mcp),
And creates a symbolic link to your project directory.
This is why, even from another workspace, you can reference and launch it via: python3 -m app.mcp_server
How VS Code Connects to the MCP Server
VS Code doesn’t “install” your MCP server directly. Instead, it launches it as a local subprocess based on your .vscode/mcp.json file.
Example:
{
  "servers": {
    "postgres-mcp": {
      "command": "/usr/local/bin/python3",
      "args": ["-m", "app.mcp_server"],
      "env": {
        "DB_HOST": "localhost",
        "DB_PORT": "5432",
        "DB_NAME": "mcpdb",
        "DB_USER": "pguser",
        "DB_PASS": "pgpass"
      }
    }
  }
}
When VS Code starts:
It reads
Launches your MCP server using the configured command
Injects environment variables (like DB creds)
Communicates via STDIO transport
And because your MCP project is already installed (thanks to pyproject.toml and pip install -e.), the python3 -m app.mcp_server command just works — even from a different workspace.
Restart VS Code and you'll see you Custom MCP Listed.
Why Build Custom MCP Servers
While vendor-provided MCP servers (like Playwright MCP or Postgres MCP) are excellent for standardized use cases — custom servers shine when you need:
Domain-specific logic (custom data models, internal APIs)
Enterprise restrictions (no external API calls allowed)
Security + control over what the model can access
Integrating multiple data sources behind one interface
In short: use Postgres MCP for simple queries, your own MCP for intelligence.
Guardrails When Using Multiple MCPs
When combining multiple MCPs (like your Postgres extension + your custom server):
Use Markdown files for context (schema summaries, queries).
Limit each MCP to its domain — one for DB introspection, one for business logic.
Maintain proper access control — never expose write or delete ops directly.
Keep the schema.json / mcp.json under version control.
Demo + Source
🎥 Watch the full video walkthrough on YouTube:
📦 GitHub Repository: https://github.com/tpushkarsingh/custom_mcp_server
🌐 Read more tutorials: https://blog.slayitcoder.in
💼 Connect with me on LinkedIn: https://www.linkedin.com/in/tpushkarsingh
Final Thoughts
The Model Context Protocol is one of the most exciting steps toward true agentic AI systems. Once you build your first custom MCP server, you’ll realize how easily you can plug real-world data and code into your AI tools — safely, locally, and smartly.
“The future of software isn’t just about writing code. It’s about letting your AI understand your entire system.”